
Today we have put together a guide on setting up a personal VPN for your files. This quick and easy-to-follow guide show’s how to use Synology VPN Server to protect your files. Anyone can follow this guide, from beginners to expert IT technicians who already have Synology hardware.
Having your own personal VPN ensures that you can send and receive files securely while still accessing these files on all your devices.
What is a personal VPN?
A personal VPN (or a Personal Virtual Private Network) is an excellent way of securing your online privacy when you are at home. Think about it as a secure tunnel that can be used to send data securely between your Synology NAS server and your laptop over the internet.
A VPN server provides privacy by hiding your browsing activity from your Internet Service Provider. You can also use it to access region-restricted websites or services such as BBC iPlayer or Netflix. In addition, you can access your data when you are away from home when connected to your VPN.
Here are the top 3 reasons for when to use a personal VPN:
- To have a personal cloud environment
- To share your data with friends and family
- Save on on-going costs for cloud storage
- Prevent your ISP from spying on you
- Transmit data security back to your home
Let’s get started by setting up your Personal VPS server
We will be setting up a Personal VPN server using OpenVPN protocol for more flexibility and for better IT security at our home. We’ve already explained why you need a personal VPN server and now it’s time to see what steps we will take to set one up, no matter where you live.
Setting up your own Synology VPN server can sound a bit daunting. Using OpenVPN protocol will ensure that your device is safe with all the security and encryption you need, particularly if you’re going to be connecting to public Wi-Fi networks.
If you’re in Melbourne, Australia and this is your first go at setting up a VPN you may need a hand. For professional advice reach out to Intuitive Strategy, the best computer repairs in Melbourne and IT support technicians.
This personal VPS server guide is great for beginners and veteran IT experts. We will show you a step-by-step visual setup guide from Synology VPS server installation to final OpenVPN Windows software deployment.
Accessing Synology Diskstation NAS to install & configure VPN Server
- Login to your Synology NAS Diskstation using your web browser using the default address https://diskstation:5000.
Alternatively, if you don’t know the IP you can use https://find.synology.com/ and it will sniff out your NAS for you.

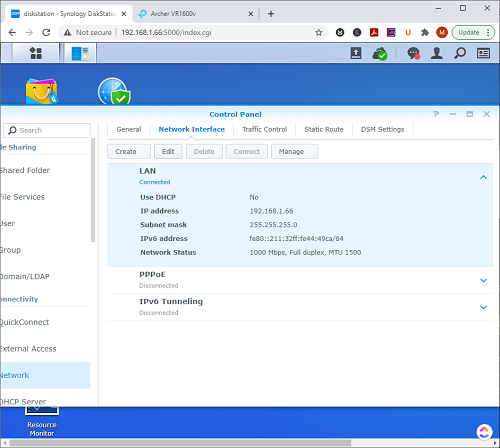
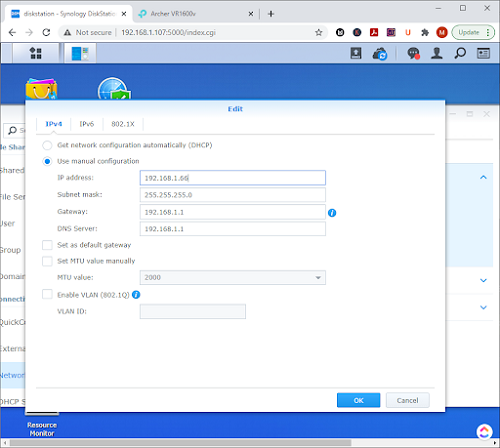
- The first thing we should do is configure a static IP for your Synology NAS. To do this we need to look inside the DSM Control Panel. Open the Control Panel from the dashboard and navigate to Network > Network Interface. Let’s go ahead and edit the LAN interface so that we can set it to use the Manual configuration option.
- Assign an IP Address that is not already used on your network and not part of your routers DHCP pool. You can use the command prompt to ping some address such as 192.168.1.66 to see if it’s free. Assign a Subnet of 255.255.255.0 and your Router’s IP address as the Default Gateway and DSN server. Later we will use the assigned IP in the routers port-forwarding or virtual servers firewall rules.
- Open the Package centre, search for ‘VPN to find VPN Server and simply hit ‘Install’ to start downloading it.

- Now that your software is installed we need to open the VPN Server. Hit the Menu button in the top left corner of your browser window. This will open all your apps, and you should see the Synology VPN Server at the bottom of the list.

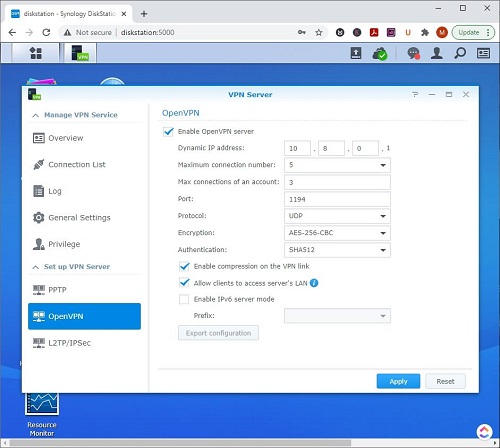
- Inside the VPN Server app navigate to the ‘OpenVPN’ section under ‘Setup a VPN Server’.You can leave the IP settings as they are but please make a note of Port 1194 and Protocl UDP. We will use this port number later when setting up the firewall rules on your router.
- Tick the ‘Enable OpenVPN server’ checkbox to enable it
- Tick ‘Enable compression on the VPN link’ if it’s not automatically ticked
- Tick ‘Allow clients to access server’s LAN’ which will let you navigate to IPs on your local network
- Hit Apply to apply all your changes.
- Now that we have done the initial OpenVPN setting we need to export the configuration file so we can use it later in our Windows client software. Save the openvpn.zip file somewhere like your Downloads.
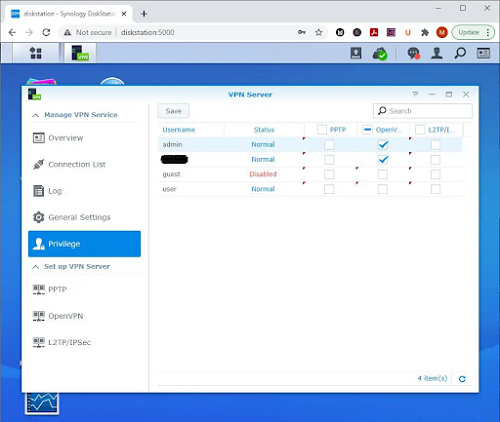
- Let’s configure VPN access privileges. You will find this section in the ‘Manage VPN Service’.
- Initially, all the checkboxes are ticked for PPTP OpenVPN and L2TP. So go ahead and untick all the protocols and users. Now only tick the OpenVPN checkbox for those users you want to have VPN access.
That’s the Synology VPN Server configuration taken care of, next we will move on to configuring your Router.
Enabling firewall rules on your router for incoming OpenVPN
With the Synology device configured it’s time to make sure we can access it on the network. Remember that IP address, port 1194 and UDP protocol we wrote down earlier, we will need them now.
In this guide, we will be connecting to a TP-Link Archer VR1600 and in our case, the routers IP is 192.168.1.1.
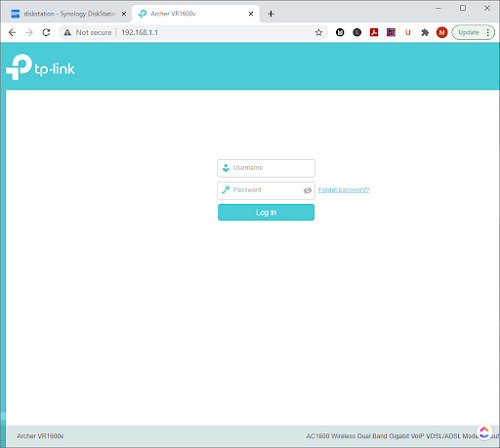
- Let’s go ahead, open a new tab in our browser and type in 192.168.1.1 to bring up the login screen.
- The default username and password for most routers is admin/admin or admin/password.
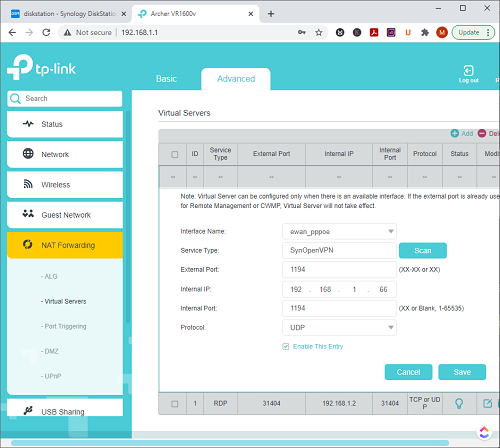
- Most routers use either Port Forwarding or Virtual Server’s to confirm access permission and firewall rules. We will be using the Advanced options to configure NAT Forwarding > Virtual Servers.
- Let’s create a new custom service or rule as some routers will call it with the following details.
- Service Name: SynOpenVPN (or any other name you want)
- External Port: 1194 (you wrote this down earlier)
- Internal IP: 192.168.1.66 (this is the IP you set on your Synology NAS)
- Internal Port: 1194 (should be the same as external port)
- Protocol: UDP (you wrote this down earlier)
- Let’s create a new custom service or rule as some routers will call it with the following details.
If you happen to be a business client and would like help with IT support in Melbourne go ahead and call Intuitive Strategy. They are IT network experts and have deployed dozens of Synology NAS devices running VPN Server in Melbourne.
How to deploy OpenVPN client on Windows
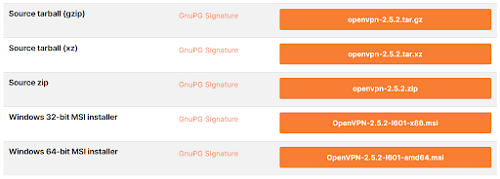
1. The first we need to do is get the latest OpenVPN download. Visit openvpn.net to get the latest Windows installer package.
2. Once downloaded run the .msi file to start the setup process. Follow the steps to complete the setup, it should only take a couple of minutes at most.
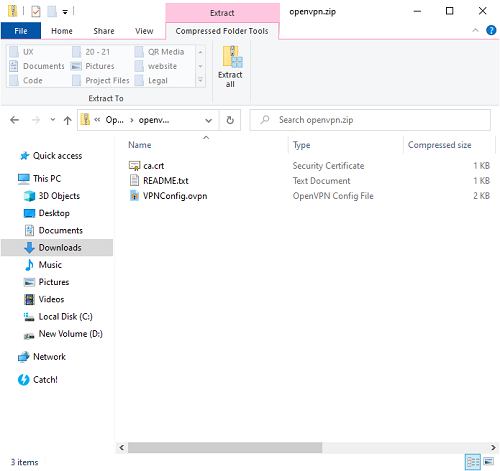
3. Remember we exported and saved the configuration zip file in our Downloads folder earlier?
a. Open your File Explorer, right-click on the ZIP file and extract it.
b. Copy the VPNConfig.ovpn file to C:\Program Files\OpenVPN\config
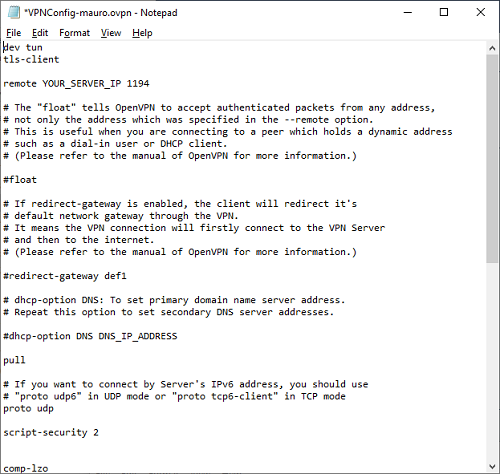
c. Next right-click that *.ovpn file to change its WAN IP or domain.

Using Notepad we can change the YOUR_SERVER_IP value to be your WAN IP address. You can get your Public IPv4 address by going to https://whatismyip.com/.
4. The last thing to do is test the connection is in fact working. To test the connection you need to be outside your home network, where your NAS is. If your laptop or desktop PC has Wi-Fi then you can use your phone’s hotspot to change networks. Just turn on your hotspot and connect to it from your laptop or desktop PC. Now you are outside of your home wireless network.
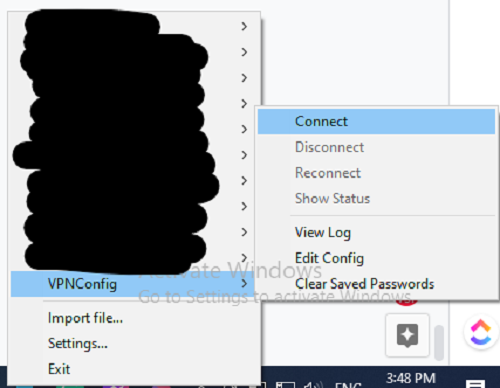
a. Connect to your OpenVPN server using the icon in Windows 10 task tray
- Right-Click on the icon
- Select VPNConfig (or whatever name you renamed the file to, if you have)
- Click Connect
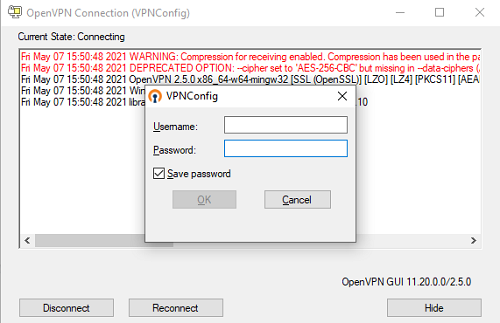
4. Next, you will be asked to enter your login credentials. These are the same as your NAS login credentials. We don’t recommend storing them if you are on a laptop in case you lose your laptop and someone gets a hold of it, as they will get easy access to your VPN.
We’ve proven that we can connect to our VPN from an external network! You can now turn off your hotspot and go back to your normal home Wi-Fi network to save on roaming costs.We hope that you have found this guide to be easy to follow and it has helped you. Let’s say thanks to Intuitive Strategy, Melbourne’s leaders in IT support and computer repair services for this guide. When you want it fixed fast and set up correctly the first time, you can count on Intuitive Strategy’s expert technicians.
Our recommendation
If you want to use a free VPN for Windows, you can try iTop VPN which is aimed to offer global users unlimited access but safe internet service. With an iTop VPN account, you can connect to the free server for a fast & stable network and enjoy private access to any website from anywhere.